Don't sleep on friendship bracelets as a hobby

friendship bracelets  - 1.jpg

After I attended The Compact summer camp last summer, I got very into making friendship bracelets. Using this Honestly WTF tutorial along with an $8 pattern I downloaded from Purl Soho, I’d put my phone in airplane mode, put on an episode of Ken Burns’ The National Parks: America's Best Idea *, and braid until my brain didn’t feel on fire anymore.

friendship bracelets  - 4.jpg

If you’re looking for a new hobby or activity, making friendship bracelets is a good one! Here are a bunch of reasons I enjoy it so much:

  • The action itself — the braiding/knotting/etc. — is very soothing and meditative.

  • You don’t have to be creative or crafty to be good at it.

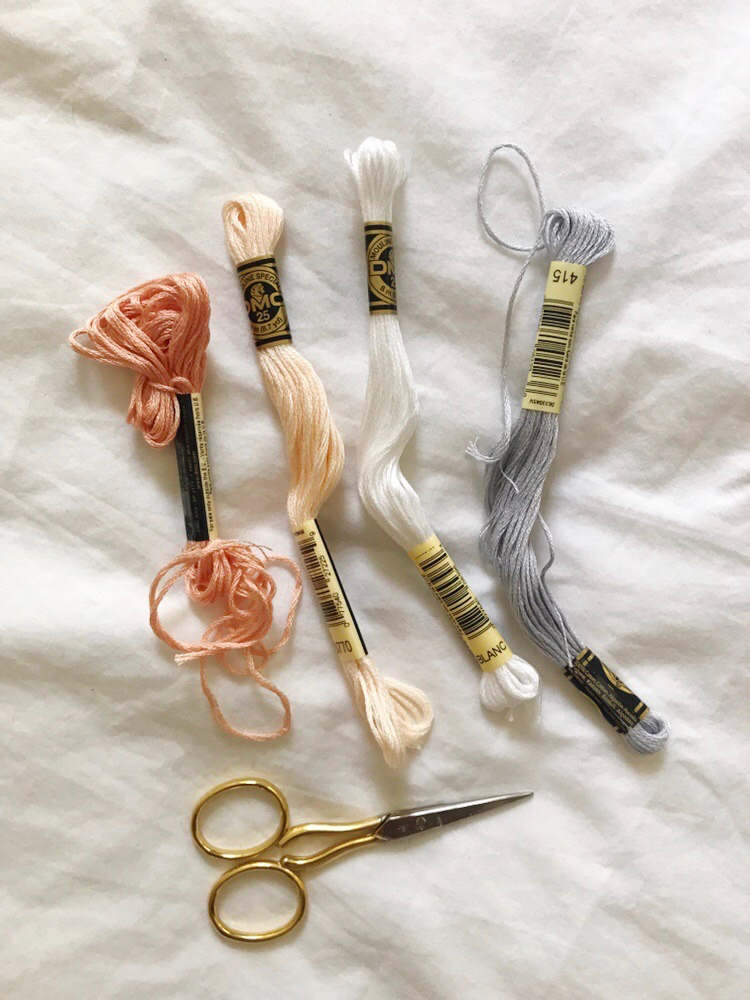
  • It’s cheap! You can make several bracelets for under $10, and possibly under $5.

  • The fact that it’s so inexpensive / that embroidery floss is so plentiful means there’s a lot less pressure to make every bracelet perfect, or to even finish. More than a few times now, I’ve started a bracelet and then messed it up, or got halfway done and decided I didn’t like the colors and I just...abandoned ship. I’ve also finished bracelets and not done anything with them afterward. You don’t have to give it to a friend or wear it yourself. Knowing this makes it easier to just sit down and do it, particularly if you’re a uhhhh….slightly-uptight perfectionist who hates being bad at things.

friendship bracelets  - 5.jpg
  • But also: friendship bracelets are honestly pretty cute, especially if you choose a more ~sophisticated~ color palette.

  • It’s a very portable hobby and the supplies don’t take up a lot of space.

  • You can do it outside! I’ve spent a few truly lovely afternoons sitting outside on a patio, chatting with good people while working on a friendship bracelet.

friendship bracelets  - 3.jpg
  • It’s a great travel hobby/activity. If you’re planning, say, a weekend at a cabin or some kind of family trip and need some fun and light activities to do by a fireplace or on a front porch, or for ~ family-friendly ~ things to do, this is a good one. You can stock up on a bunch of embroidery floss and a grab a pack of safety pins before you go and you’re...pretty much set. (You may also want to pack a small pair of scissors.) I like it for trips because you can do it alone (while, say, everyone else is reading or playing a game) or a bunch of people can do it as a group. In my experience, it’s something that most people haven’t done since they were young, so they don’t realize how fun it can be...but once they get going, they find themselves really enjoying it and/or easily being able to execute complicated patterns they mastered when they were tweens.

  • It’s a great way to not be on your phone. If you want to stop scrolling through Instagram or Twitter, you can pick up a friendship bracelet in progress and work on that for a little while.

Get the tutorials: DIY Friendship Bracelet, Honestly WTF and Classic Friendship Bracelet Pattern, $8 from Purl Soho. Also, I haven’t mastered this yet, but it’s lovely: Monochrome Friendship Bracelets, Purl Soho.


PS If you want to make your bracelets a little sturdier / less likely to fade, you can use knotting cord instead of embroidery floss.


*I definitely need to write a separate post on why Ken Burns documentaries are good shit. ✨

🍑


This homemade hummus is truly the best hummus

homemade hummus lead image.JPG

Last month, my mom texted me from the grocery store a few days before she drove out to visit me in New York. She sent me a photo of a package of mini naan “dippers” with the message, “Are you going to make hummus while we are there? I can bring some of these.” I replied, “I probably will not make hummus, but maybe I could.” An hour later, after some other unrelated conversation, she texted me, “I bought those little breads so you really should make hummus.”

And really, how could I argue with that?

The hummus she was talking about was developed by chef Michael Solomonov of Zahav restaurant in Philadelphia. I’ve made it a few times now — including when my mom visited me in early January.

homemade hummus.JPG

It is completely reasonable that my mom has developed a taste for this hummus after having it once. This hummus is...incredible. As my former coworker Michelle wrote about it, “If you have the energy to learn how to prepare just one food over the course of your lifetime, let it be this one.” It’s so creamy, so flavorful, so...special. I love it on bread, but also on perfect chicken and roasted vegetables.


A couple recipe notes:

  • The hummus isn’t at all hard to make, but I think it’s kind of an Event. I think it’s just because it has kind of a lot of steps (the first of which starts the night before you actually make it), and also because I have a small New York kitchen. In any case, it’s absolutely worth it.

  • I’ve made the hummus with both dried chickpeas and canned chickpeas. The dried chickpeas are definitely better (the final effect is just creamier) but using canned beans won’t ruin it. Basically, if you forgot to soak the beans and now think you can’t make it, go ahead and use canned; they are definitely good enough.

dried chickpeas.JPG
  • I’ve been using my KitchenAid stand mixer with the whisk attachment to make the tehina sauce and that works very well. The second time I made it, I inexplicably temporarily lost my mind and made the tehina in my food processor....which WORKED, but it required a lot more dishes and everything just got really messy. It wasn’t until later that I realized I hadn’t done that the first time — which why it was a much pleasanter/easier experience the first time! (You can also whisk it by hand, of course.)

  • When I made it last month, I used the extra tehina sauce that I’d frozen the last time around and it worked perfectly! (I let it thaw for about 24 hours first.) The tehina sauce recipe makes twice the amount you need, and it’s definitely worth saving/freezing it to use later; it cuts down on the amount of time and energy you’ll spend the second time in a pretty meaningful way.

homemade hummus close upJPG

A modest proposal: Take notes when you’re hanging out with friends

FullSizeRender.jpg

I’ve written before about my friend Julia’s Ladies Article Club, which I’ve had the pleasure of attending on a couple of occasions when I’ve been in D.C. visiting her. I love a lot of things about it, but one of my favorite aspects is that someone always takes notes during the gathering. The note-taker writes down anything that comes up during the conversation that warrants some kind of follow-up — so basically, if someone mentions a product or a recipe or a podcast episode or a good Instagram account, the note-taker adds it to her list. Then she’ll start an email thread with everyone later on to collect/share the items mentioned.

I’ve always thought this idea was so smart and efficient, and I’ve started doing it more when hanging out with friends — even, just, like, during a coffee date. I like doing it because it’s practical, but also because writing these items down in my journal creates a mini diary entry about the hangout/the conversation.


Last month, I was at my friend Emily’s apartment for a little friend dinner party, and when she mentioned a book she liked, I said, “Wait, I’m going to write down the stuff we talk about so I can look it up later.” I pulled out my notebook and pen and Jess said, “Welcome to Rachel’s meeting,” and everyone laughed. AND YET! An hour or so later, Emily asked me where my pullover and my socks were from, and when I told her, she said, “Wait, I want to write all this down,” and took out her phone and opened the Notes app. And later that night, after we’d all gone home, Jess texted the group and said, “Who is sending out the meeting notes?” And we all sent around the things that we’d discussed and made note of.

I always think I’m going to remember all the things I mention or that my friend mentions when we’re hanging out, but when you’re with smart/well-read/interesting people, that’s basically impossible. Just take notes! ✍🏽

🍑

Tiny life tip: use your iPhone’s photo search function more

Here’s an extremely small tip that might make your life slightly easier if you ever find yourself scrolling through iPhone photos for a very long time trying to unearth a specific photo you know is on your phone somewhere: you can search your iPhone photos by date! The search button is at the bottom right whenever you’re looking at your photos.

IMG_4716.PNG

So, for example, if you wanted to look at all of your Christmas photos, you could type “December” in the search bar and be shown all the photos you took in any December ever. And if you wanted to look at your Christmas photos from a specific year, you could type “December 2015” in the search bar and limit your search results even further. As long as you know roughly when you took/saved a photo, it’s a super helpful shortcut.

IMG_4717.PNG
IMG_4718.PNG

You can also search for things that are in the photos — like, say, “dog” — but I’ve found that’s far less reliable, and that searching by date is ultimately more likely to be successful! 📸

🍑

Just Good Shit: 04.07.19

Image: Kiyana Salkeld / Just Good Shit

Image: Kiyana Salkeld / Just Good Shit

Happy Sunday! Here’s a recap of what I was into this week.

Reading

Watching & listening to

Podcasts

I listened to an old episode of Nancy, "The Pentagon's Secret Gaggle of Gays," which is so goddamn good. I also really liked the cartoon sound effects episode of Twenty Thousand Hertz, and downloaded several others to listen to.

Streaming

On Friday night, after a long week and wanting to zone out with light and easy, I watched some old episodes of I Love Lucy on Amazon Prime. I also watched Free Solo and...did not love it? It's a movie about a man wanting to do something incredibly dangerous, all the people who know him begging him not to, and him doing it anyway. It's a no from me, dawg. â›°

Sign up to receive these links each week in an email.

🍑

Extremely good shit: this chickpea pasta recipe

Much like I believe in wearing the same clothes all the time, I am big on figuring out a few recipes that work for me and making them over and over and over again. This chickpea pasta recipe is one such recipe. It’s filling, it’s nourishing, it’s inexpensive (seriously, my grocery bill dropped considerably after I started making this several nights a week), it’s fast/easy, it warms up well the next day, it’s vegetarian and dairy-free (if you’re into that sort of thing), and you can basically always have the ingredients available to be able to make it. (More on that in a moment.) I’ve recommended it to so many people, and they’re all believers now.

If/when you’re ready to join the Cult of CPP, here are some tips I’ve found for making it even easier to make.

fresh rosemary.jpg
  • Don't skip the finishing oil; that's where all the flavor is!

  • Cut/measure/prep all the ingredients before you start cooking. There aren’t very many ingredients, so it’s mostly a matter of doing things like opening a can of chickpeas, draining, and rinsing them; crushing a couple of garlic cloves; and measuring out pasta and tomato paste. The reason I suggest doing this is because once you start making it, everything moves very fast, and you won't really have time to do those things while the food is cooking like you might with other recipes.

rosemary frozen in cubes.JPG
  • Instead of chopping fresh rosemary for the finishing oil every time you make it, you can chop a bunch of rosemary at once and then freeze it in individual portions olive oil cubes. I freeze the teaspoon of fresh rosemary in 1 and ½ tablespoons of olive oil — because that’s what my ice cube trays can hold — and then add the additional ½ tablespoon of olive oil when I’m making the recipe. I pop out a cube when I start making the recipe, and by the time I’m ready to make the finishing oil, it’s basically thawed. Using the rosemary cubes is so convenient and it means that I’m both less likely to waste extra rosemary and more likely to have the ingredients I need on hand all the time.

chickpea pasta tomato paste.jpg
  • You can actually freeze the tomato paste in individual servings too. (In general, freezing extra tomato paste is a good move because so rarely do you need the entire can!) It’s not like opening a can of tomato paste, measuring some out, washing the tablespoon, and rinsing the can/peeling off the label for the recycling bin is oppressive or anything...but it’s also a step I’d rather not fuck with every time if I don’t have to.

mason jar with measurements.jpg
  • If you’re feeling really motivated and meal-preppy, you could transfer the pasta to a Mason jar with measurement marks on the side so you don’t have to pour it into a measuring cup each time you’re making it.

This recipe is truly so great; it’s right up there with the perfect chicken in terms of how much I love it and how often I recommend it.

Get the recipe: Quick pasta and chickpeas, Smitten Kitchen. 🍝

🍑

These bamboo nursing pads are great for taking off your makeup

bamboo makeup remover pads.JPG

I don’t know if this is true in other cities, but in NYC, cotton rounds are really expensive. Like, every time I go to buy them, I’m surprised by how expensive they are. I used them for years (with Garnier micellar water, one of my most-used products) to take my makeup off at night and then to wash my face in the morning. But I recently came across a cheaper and less wasteful option: organic bamboo nursing pads ($13.90 for a pack of 10 on Amazon).

bamboo makeup remover pad.gif

As you can see, they are pretty big; I can cycle through the different “petals” to take off my makeup at night, getting several uses out of one pad. And once a pad is fully covered in mascara and eyeliner, I just toss it in the laundry. I still buy cotton rounds to take off my nail polish, but now I buy them far less.

Get a pack of 10 pads on Amazon for $13.90. đź’¦

🍑

The perfect chicken recipe

the perfect chicken.jpg

When I think of what “just good shit” means to me, I think of the perfect chicken recipe. I discovered it on Pinterest several years ago (via a really janky photo, the source for which is no longer available and hasn’t been for years). Before I found this recipe, I was basically afraid of cooking chicken. But this recipe truly is perfect; the chicken always cooks all the way through (even when the chicken breasts are way too thick to be anything but weirdo genetically engineered chicken breasts because no HEN has titties like that, I’m sorry) and is incredibly juicy and flavorful.

The perfect chicken recipe consists of two things: a five-ingredient spice blend and a cooking method. I usually eat it on salads or with a side of roasted vegetables and potatoes, but if ever I need chicken for another recipe, this is the recipe I use.

The recipe below is for a single serving of the spice mix, but these days, I make it in bigger batches (combining ~6 tablespoons of each spice) and store the blend in a container in my pantry.

Ingredients

  • 1 lb. chicken breasts

  • 1/2 tsp salt

  • 1/2 tsp pepper

  • 1/2 tsp garlic powder

  • 1/2 tsp onion powder

  • 1/2 tsp paprika

  • 1-2 tbsp olive oil

Preparation

  1. Preheat the oven to 350.

  2. Combine spices in a small bowl, then sprinkle over both sides of the chicken breasts, rubbing in to coat. (Note: When I’m adding the spice blend from my big pantry jar, I just eyeball how much I'm sprinkling on each side, and I tend to season pretty heavily. Bland food is bland! Don't be part of the problem!)

  3. Add olive oil to the bottom of a Dutch oven or oven-proof pan and cook the chicken over medium-high heat for 3-4 minutes per side.

  4. Put the pan uncovered into oven and cook for 25 minutes.

  5. Let the chicken rest 5-10 minutes before serving.


Note: I've used the cooking method with other spices/recipes, and the technique works nicely with those too, but I like this spice blend the best! 🍗

🍑